make a boring nightstand look fancy
awhile back hubby and i went to ikea to get some stuff for our guest room. i had a vision of what i wanted our guest room to resemble and had to make some adjustments when we found out the white bed frame that i wanted wasn't in stock and there was no way we were going back to ikea any time soon. i originally wanted a white bed frame and a nightstand that i could paint a color like yellow or some sort of teal or something. but i settled on a black bed frame, a white dresser and i picked up an unfinished night stand thinking that i wanted to paint it a color still. but after envisioning it in my head i felt like it would not go well together if each piece of furniture in the guest room was a different color. so i settled again on white for the nightstand and went to lowe's to grab some swatches of white. so. many. shades. of. white. i painted the nightstand and felt like it was really boring. i wanted to add some grasscloth wall paper to the front of the drawer like this:
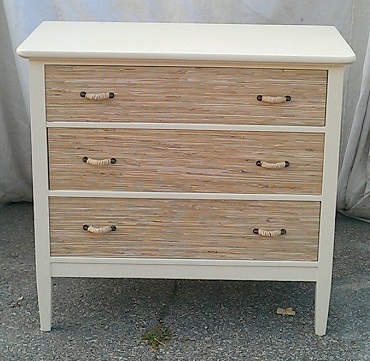
but i wasn't able to purchase a small amount of the grasscloth, and i didn't feel like spending more on the wall paper than the nightstand. i remembered that i still had some paintable wall paper that from a previous project, my old dresser. so i decided to use that instead. i cut it, adhered it and painted over it. i wanted to frame it with small molding pieces, so i went to lowe's and picked up an 8 foot long trim. i don't have a miter saw unfortunately but saw that lowe's has miter boxes with a small saw for about $12 so i grabbed that, too. i measured and did all that and cut the wood with the miter box and saw. it turned out pretty rough because i think the saw wasn't ideal for the soft wood that i picked up. but i read that you can caulk the corners before painting to hide any flaws. so i did that. and for the most part it looked ok. i glued the trim on using gorilla glue and then painted the front of the dresser again. i finally decided on a handle/knob that i found on urban outfitters' website and ordered it. that's all there was to it. so here is the before:

pretty plain, huh? and here is the after
so there you go. maybe someday down the road i will re-do it, i like to change things up a lot cause i get bored with the same look forever. some of the things i learned while i fumbled through this project:
-i need to get a miter saw, the miter box and backsaw that i bought are not super easy to work with and take about 5 times longer than if i used a miter saw
-when using gorilla glue, make sure place something heavy over the thing you are gluing or use clamps, this ensures that there will not a gap between the thing you are adding and the substrate. i stupidly did not do this and so the trim pieces dried not flush to the drawer, there is a small gap, so i will have to go back and caulk that at some point to make it look more seamless
-caulk is awesome and can hide minor imperfections
-urban outfitters has really cute housewares
-don't be afraid to start a project even if you don't know what you are doing, you'll figure it out and even if you mess up there is usually a way to fix it
but i wasn't able to purchase a small amount of the grasscloth, and i didn't feel like spending more on the wall paper than the nightstand. i remembered that i still had some paintable wall paper that from a previous project, my old dresser. so i decided to use that instead. i cut it, adhered it and painted over it. i wanted to frame it with small molding pieces, so i went to lowe's and picked up an 8 foot long trim. i don't have a miter saw unfortunately but saw that lowe's has miter boxes with a small saw for about $12 so i grabbed that, too. i measured and did all that and cut the wood with the miter box and saw. it turned out pretty rough because i think the saw wasn't ideal for the soft wood that i picked up. but i read that you can caulk the corners before painting to hide any flaws. so i did that. and for the most part it looked ok. i glued the trim on using gorilla glue and then painted the front of the dresser again. i finally decided on a handle/knob that i found on urban outfitters' website and ordered it. that's all there was to it. so here is the before:
pretty plain, huh? and here is the after
 |
| the finished product |
 |
| cute knob from urban outfitters |
 |
| the paintable wall paper that kind of looks like small beadboard |
-i need to get a miter saw, the miter box and backsaw that i bought are not super easy to work with and take about 5 times longer than if i used a miter saw
-when using gorilla glue, make sure place something heavy over the thing you are gluing or use clamps, this ensures that there will not a gap between the thing you are adding and the substrate. i stupidly did not do this and so the trim pieces dried not flush to the drawer, there is a small gap, so i will have to go back and caulk that at some point to make it look more seamless
-caulk is awesome and can hide minor imperfections
-urban outfitters has really cute housewares
-don't be afraid to start a project even if you don't know what you are doing, you'll figure it out and even if you mess up there is usually a way to fix it


Comments
Post a Comment